In this project, I developed a system that combines deep learning-based image segmentation with reinforcement learning to automatically navigate to regions of interest in ultrasound images. This approach has potential applications in medical imaging and robotic ultrasound guidance.
The project consists of three main components:
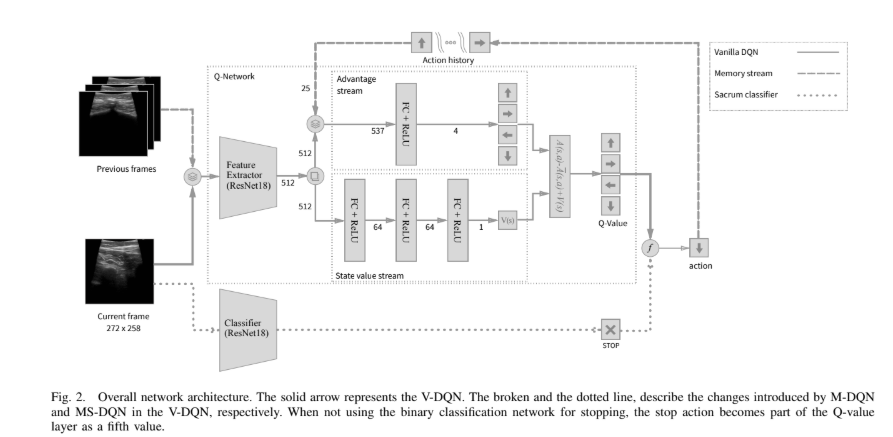
For the segmentation task, I used a U-Net architecture with a ResNet18 backbone. This model was trained on a dataset of abdominal ultrasound images to identify regions of interest.
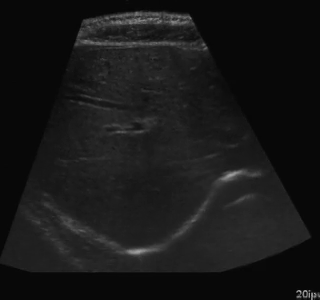
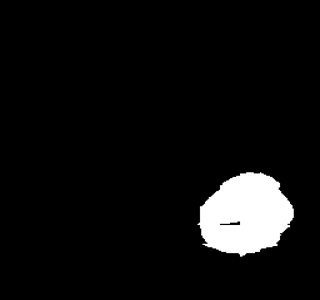

Example of segmentation results on an abdominal ultrasound image. The top left in the above is the orginal cropped image of the Ultrasound , the top right shows the mask_cropped image after the segmentation . Then combining these two we get our overalled_cropped image where the red overlay shows the segmented region of interest.
class SimpleResNetUNet(nn.Module):
    def __init__(self, in_channels=1, out_channels=1):
        super(SimpleResNetUNet, self).__init__()

        # Load a pre-trained ResNet18 model
        self.resnet = models.resnet18(pretrained=True)

        # Modify the first layer to accept grayscale images
        self.resnet.conv1 = nn.Conv2d(in_channels, 64, kernel_size=7, stride=2, padding=3, bias=False)

        # Encoder (ResNet18 layers)
        self.encoder1 = nn.Sequential(self.resnet.conv1, self.resnet.bn1, self.resnet.relu)  # 64 channels
        self.pool1 = self.resnet.maxpool
        self.encoder2 = self.resnet.layer1  # 64 channels
        self.encoder3 = self.resnet.layer2  # 128 channels
        self.encoder4 = self.resnet.layer3  # 256 channels
        self.encoder5 = self.resnet.layer4  # 512 channels

        # Decoder
        self.upconv5 = nn.ConvTranspose2d(512, 256, kernel_size=2, stride=2)
        self.decoder5 = self._make_decoder_block(512, 256)

        self.upconv4 = nn.ConvTranspose2d(256, 128, kernel_size=2, stride=2)
        self.decoder4 = self._make_decoder_block(256, 128)

        self.upconv3 = nn.ConvTranspose2d(128, 64, kernel_size=2, stride=2)
        self.decoder3 = self._make_decoder_block(128, 64)

        self.upconv2 = nn.ConvTranspose2d(64, 32, kernel_size=2, stride=2)
        self.decoder2 = self._make_decoder_block(64, 32)

        self.upconv1 = nn.ConvTranspose2d(32, 16, kernel_size=2, stride=2)
        self.decoder1 = self._make_decoder_block(16, 16)

        # Final output layer
        self.conv_final = nn.Conv2d(16, out_channels, kernel_size=1)

    def _make_decoder_block(self, in_channels, out_channels):
        return nn.Sequential(
            nn.Conv2d(in_channels, out_channels, kernel_size=3, padding=1),
            nn.BatchNorm2d(out_channels),
            nn.ReLU(inplace=True),
            nn.Conv2d(out_channels, out_channels, kernel_size=3, padding=1),
            nn.BatchNorm2d(out_channels),
            nn.ReLU(inplace=True)
        )

    def forward(self, x):
        # Encoder
        e1 = self.encoder1(x)  # 64 channels, 1/2 resolution
        p1 = self.pool1(e1)    # 64 channels, 1/4 resolution
        e2 = self.encoder2(p1) # 64 channels, 1/4 resolution
        e3 = self.encoder3(e2) # 128 channels, 1/8 resolution
        e4 = self.encoder4(e3) # 256 channels, 1/16 resolution
        e5 = self.encoder5(e4) # 512 channels, 1/32 resolution

        # Decoder
        d5 = self.upconv5(e5)  # 256 channels, 1/16 resolution
        d5 = torch.cat((d5, e4), dim=1)  # 512 channels, 1/16 resolution
        d5 = self.decoder5(d5)  # 256 channels, 1/16 resolution

        d4 = self.upconv4(d5)  # 128 channels, 1/8 resolution
        d4 = torch.cat((d4, e3), dim=1)  # 256 channels, 1/8 resolution
        d4 = self.decoder4(d4)  # 128 channels, 1/8 resolution

        d3 = self.upconv3(d4)  # 64 channels, 1/4 resolution
        d3 = torch.cat((d3, e2), dim=1)  # 128 channels, 1/4 resolution
        d3 = self.decoder3(d3)  # 64 channels, 1/4 resolution

        d2 = self.upconv2(d3)  # 32 channels, 1/2 resolution
        d2 = torch.cat((d2, e1), dim=1)  # 96 channels, 1/2 resolution
        d2 = self.decoder2(d2)  # 32 channels, 1/2 resolution

        d1 = self.upconv1(d2)  # 16 channels, original resolution
        d1 = self.decoder1(d1)  # 16 channels, original resolution

        out = self.conv_final(d1)  # out_channels, original resolution

        return torch.sigmoid(out)
The model was trained using a combination of binary cross-entropy and Dice loss to ensure accurate segmentation of the regions of interest.
After segmentation, I implemented an algorithm to find the centers of the segmented regions:
def find_center(mask):
    """
    Find the center of the segmented region

    Args:
        mask: Binary mask of the segmented region

    Returns:
        center: (x, y) coordinates of the center
    """
    if np.sum(mask) > 0:
        y_indices, x_indices = np.where(mask)
        center_x = int(np.mean(x_indices))
        center_y = int(np.mean(y_indices))
        return (center_x, center_y)
    else:
        # If no segmentation found, return the center of the image
return (mask.shape[1] // 2, mask.shape[0] // 2)For the navigation task, I implemented a DQN agent with experience replay to learn how to navigate to the centers of the segmented regions. The agent was trained to move a viewing window across the ultrasound image to find the region of interest.
The environment simulates a moving ultrasound probe that can navigate across the image:
class AbdomenNavigationEnv:
    def __init__(self, image_files, centers_dict, view_size=(64, 64), max_steps=100, history_length=5):
        """
        Initialize the environment

        Args:
            image_files: List of image file paths
            centers_dict: Dictionary mapping image filenames to center coordinates
            view_size: Size of the agent's view window
            max_steps: Maximum number of steps per episode
            history_length: Number of previous positions to track for oscillation detection
        """
        self.image_files = image_files
        self.centers_dict = centers_dict
        self.view_size = view_size
        self.max_steps = max_steps
        self.history_length = history_length

        # Action space: 0=left, 1=up, 2=right, 3=down, 4=stay
        self.num_actions = 5

        # Movement parameters
        self.move_step = 20  # Pixels to move per action

        # Current state variables
        self.current_image = None
        self.current_image_path = None
        self.current_center = None
        self.current_position = None
        self.current_view = None
        self.steps_taken = 0

        # Position history for oscillation detection
        self.position_history = []

        # Velocity for momentum
self.velocity = (0, 0)One of the key challenges in this project was addressing the oscillating behavior of the RL agent. I implemented several improvements to reduce oscillations:
def _calculate_reward(self, distance):
    """
    Calculate the reward based on the distance to the center

    Args:
        distance: Euclidean distance to the center

    Returns:
        reward: Reward value
    """
    # Smoother distance-based reward (quadratic)
    distance_reward = -0.001 * (distance ** 2)

    # Bonus for being very close to the center (smoother gradient)
    if distance < 5:
        distance_reward += 20.0
    elif distance < 10:
        distance_reward += 10.0 * (1 - (distance - 5) / 5)  # Linear decay from 10 to 5
    elif distance < 20:
        distance_reward += 5.0 * (1 - (distance - 10) / 10)  # Linear decay from 5 to 0

    # Penalize oscillations
    oscillation_penalty = 0
    if self._is_oscillating():
        oscillation_penalty = -5.0  # Significant penalty for oscillating

    # Reward for moving toward the center
    progress_reward = 0
    if len(self.position_history) > 1:
        prev_distance = np.sqrt(
            (self.position_history[-2][0] - self.current_center[0]) ** 2 +
            (self.position_history[-2][1] - self.current_center[1]) ** 2
        )
        # Reward for getting closer to the center
        progress_reward = (prev_distance - distance) * 0.5

    # Small step penalty to encourage efficiency
    step_penalty = -0.05

return distance_reward + step_penalty + oscillation_penalty + progress_rewardThe trained agent successfully navigates to the centers of the segmented regions with a high success rate. The improvements to address oscillations significantly enhanced the agent's performance.
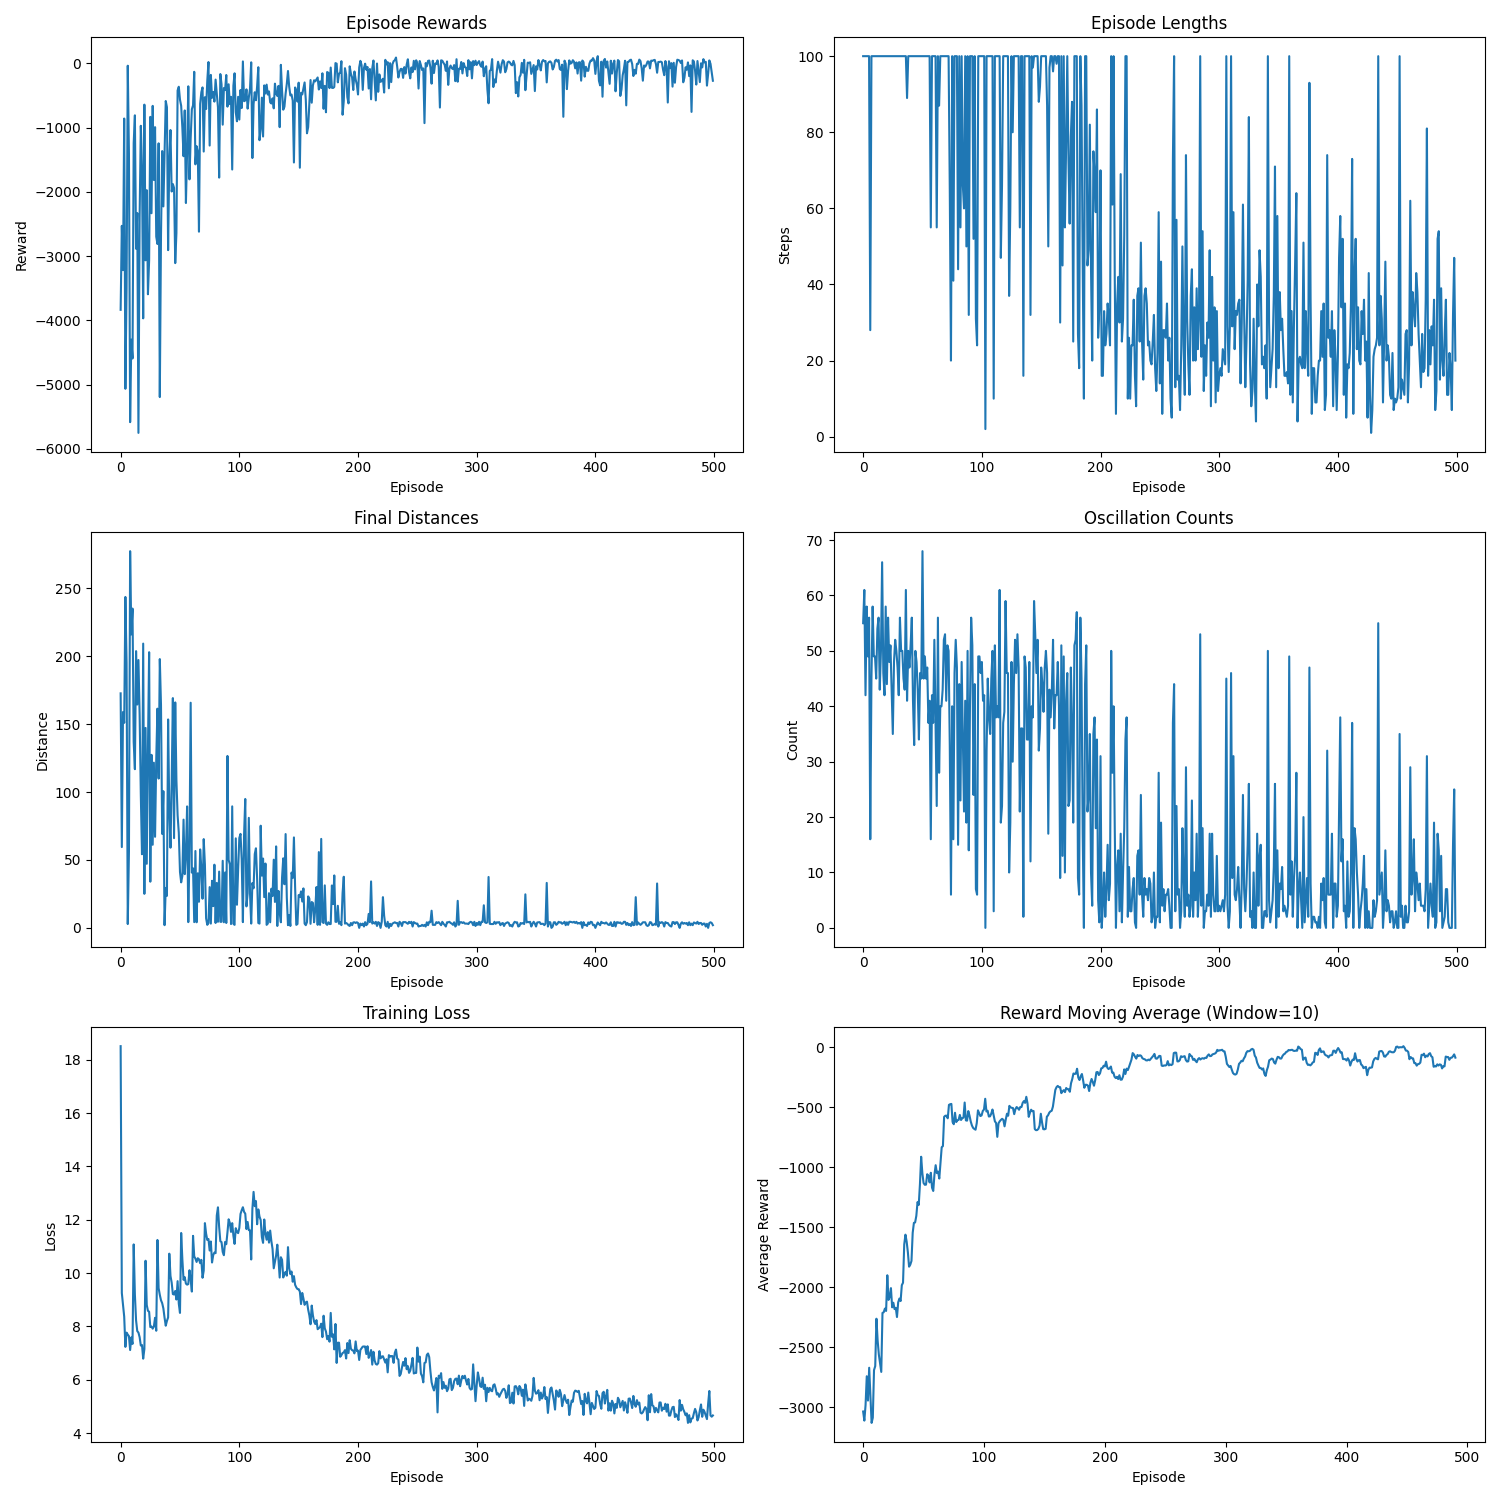
Training metrics showing the agent's performance improvement over time. The graphs show episode rewards, episode lengths, final distances to target, oscillation counts, training loss, and reward moving average.
Here's an example of the agent navigating to a segmented region:
Visualization of the agent's navigation during training (episode 500). The agent learns to navigate efficiently to the target center.
Visualization of the agent's navigation during evaluation. The agent successfully navigates to the target center with minimal oscillations.
There is a significant gap between the image quality used in training and what would be encountered in real-world ultrasound probe motion. Several factors impact the performance of the model in real-world scenarios:
When tested on new data with different image characteristics, the model sometimes fails to properly identify the target regions. These failure cases highlight the importance of diverse training data that captures the full range of conditions encountered in practice.
The sequence and quality of images used during training significantly impact the model's performance. Key observations include:
For robust real-world performance, the model needs to balance:
This project demonstrates the potential of combining deep learning-based image segmentation with reinforcement learning for automated navigation in medical imaging. The approach could be extended to real-world applications such as robotic ultrasound guidance, where a robot could automatically position an ultrasound probe to capture images of specific anatomical structures.
Future work could include:
The complete code for this project is available on GitHub. Feel free to explore the code, try it out, and adapt it for your own projects.
Have questions, suggestions, or feedback? I'd love to hear from you! You can: